Focaccia with Roasted Squash

Thanksgiving is always a conflict for me on the food front. I want to keep things traditional but yet I want to try new recipes and start new traditions. Last year I was dead set on lamb roast instead of turkey which was a good call. This year my bro-in-law suggested capon to replace the turkey. Capon is just a glorified chicken so yeah, it tasted like a great roast chicken. Appetizers is kind of an area that’s free range on Thanksgiving so I decided to make Foccacia with Roasted Squash inspired by the feature in Food and Wine magazine last month. However when it comes to baking bread I often visit America’s Test Kitchen for a bit more education therefore the recipe below is a hodgepodge of the two.

The process of making focaccia is a bit more arduous then I remember but oh boy does it deliver. Light and airy with tons of flavor and moisture. You could put just about anything on top of focaccia and it would be great.

Stay tuned for my dessert masterpiece.

Focaccia with Roasted Squash

Focaccia with Roasted Squash

Sliced up ready to eat!

Sliced up ready to eat!

Biga

  • 1/2cup (2 1/2 ounces) unbleached all-purpose flour
  • 1/3cup (2 2/3 ounces) warm water (100-110 degrees F)
  • 1/4teaspoon instant or rapid-rise yeast

Dough

Topping

  • Butternut squash
  • Olive oil
  • Thyme
  • Salt

1. FOR THE BIGA: Combine flour, water, and yeast in large bowl and stir with wooden spoon until uniform mass forms and no dry flour remains, about 1 minute. Cover bowl tightly with plastic wrap and let stand at room temperature (about 70 degrees) overnight (at least 8 hours and up to 24 hours.) Use immediately or store in refrigerator for up to 3 days (allow to stand at room temperature 30 minutes before proceeding with recipe.)

2. FOR THE DOUGH: Stir flour, water, and yeast into biga with wooden spoon until uniform mass forms and no dry flour remains, about 1 minute. Cover with plastic wrap and let rise at room temperature for 15 minutes.

3. Sprinkle 2 teaspoons salt over dough; stir into dough until thoroughly incorporated, about 1 minute. Cover with plastic wrap and let rise at room temperature 30 minutes. Spray rubber spatula or bowl scraper with nonstick cooking spray; fold partially risen dough over itself by gently lifting and folding edge of dough toward middle. Turn bowl 90 degrees; fold again. Turn bowl and fold dough 6 more times (total of 8 turns). Cover with plastic wrap and let rise for 30 minutes. Repeat folding, turning, and rising 2 more times, for total of three 30-minute rises. Meanwhile, adjust oven rack to upper-middle position, place baking stone on rack, and heat oven to 500 degrees at least 30 minutes before baking.

4. Gently transfer dough to lightly floured counter. Lightly dust top of dough with flour and divide in half. Shape each piece of dough into 5-inch round by gently tucking under edges. Coat two 9-inch round cake pans with 2 tablespoons olive oil each. Sprinkle each pan with ½ teaspoon kosher salt. Place round of dough in pan, top side down; slide dough around pan to coat bottom and sides, then flip over. Repeat with second piece of dough. Cover pans with plastic wrap and let rest for 5 minutes.

5. Using fingertips, press dough out toward edges of pan. (If dough resists stretching, let it relax for 5 to 10 minutes before trying again.) Using dinner fork, poke surface of dough 25 to 30 times, popping any large bubbles. Spread squash evenly over top and push into dough.Let dough rest until slightly bubbly, 5 to 10 minutes.

6. PREPARE THE TOPPING Preheat the oven to 400°. In a large bowl, toss the squash with the 2 tablespoons of olive oil and season with salt and pepper. Spread the slices in a single layer on 2 large rimmed baking sheets and roast for about 15 minutes, until tender; let cool completely. Increase the oven temperature to 450°.

7. Gently curl the cooled squash slices and press them into the dough. Brush the focaccia with olive oil and bake for 25 to 30 minutes, until risen and browned on top. Transfer to a rack and let cool for 5 minutes.

Soft Pillowy Pumpkin Sandwich Cookies

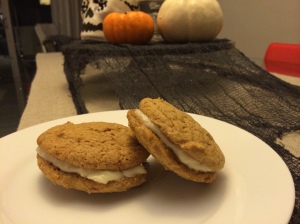
Here comes another seasonal recipe – Pumpkin Sandwich Cookies with a Cream Cheese Filling. I shared these with friends in a plain white box decorated with washi tape (my new obsession). What I love about these cookies is their texture is more that of a cake than a cookie.

IMG_5774.JPG

Pumpkin Sandwich Cookies

IMG_5814.JPG

Washi Tape on White Box


Recipe from A Cozy Kitchen

Cookies:
2 1/2 cups all-purpose flour
1 teaspoon baking powder
1 teaspoon baking soda
1/2 teaspoon ground cardamon
1 1/2 teaspoons ground cinnamon
1/4 teaspoon ground nutmeg
1/2 teaspoon salt
1 cups granulated white sugar
1/2 cup brown sugar
1/2 cup butter (1 stick), softened
1 large egg
1 teaspoon vanilla extract
1 cup of pure pumpkin puree (canned or homemade)
2 tablespoons of pumpkin seeds (optional)

Cream Cheese Frosting:

1/4 cups butter, softened
4 ounces, cream cheese, softened
1 cups sifted powdered sugar
1/2 teaspoon vanilla extract

For the cookies:
Preheat oven to 350F. Line a baking sheet with a silpat or parchment.

In a medium bowl, combine the flour, baking powder, baking soda, cardamon, cinnamon, nutmeg and salt. Mix and set aside.

In another medium bowl, beat the granulated sugar, brown sugar and softened butter until combined and blended. Add the egg, vanilla extract, pumpkin and beat until smooth.

Grab a spatula or wooden spoon, and in two batches, gradually mix in flour mixture, until thoroughly combined.

Using a stainless-steel ice cream scoop (with one of those hand releases), drop the cookie dough onto the parchment lined baking sheet, being sure to leave room for the dough to spread. If you don’t have an ice cream scooper, you could also drop the dough using two teaspoons.

Sprinkle 3 or 4 pumpkin seeds on the top of the cookies for decoration. I tried to put them in a trio just for appearance purposes. (This is totally optional.)

Bake for 15 minutes, or until the edges of the cookies are lightly golden brown. They should still be soft to the touch. Carefully transfer to a rack to cool completely.

For the icing:

In a medium bowl, beat the butter and cream cheese until smooth and creamy. Add the powdered sugar and vanilla. Beat until completely smooth.

Assembly:

Flip half of the cookies upside down. Using a butter knife, dollop one teaspoon of the icing in the center of each upside down cookie. Smooth it around with your knife until the icing just reaches the edges. Top with another cookie and gently press the two cookies together.

Cookies should be stores in an airtight container and will be moist and delicious for up to 2 days.

Yields about 12 sandwich cookies

Buttermilk Apple Cake

This was a splendid recipe that came out very moist (thank you buttermilk) and was a great compliment to a morning coffee. It’s got a nice presentation too.

IMG_6132.JPG

Buttermilk Apple Cake


12 tablespoons unsalted butter, room temperature

1 1/2 cup sugar, plus 4 tablespoons for topping

2 egg, room temperature

2 teaspoon vanilla extract

3 cups all-purpose flour

4 teaspoons baking powder

1/2 teaspoon sea salt

1/2 teaspoon freshly grated nutmeg, plus more for topping

1 cup buttermilk

grated zest of 2 large lemons

grated zest of 1 large orange

2 large gala apples, peeled, cored, and cut into 1/2-inch thick slices

Preheat the oven to 350 degrees F. Liberally grease or spray two 9-inch cake pans.

Using a stand mixer fitted with the paddle attachment or hand held beaters, beat the butter on medium speed until light and airy. Add sugar, and continue beating until everything is pale and fluffy. Stop mixer as needed to scrape down the sides. Switch mixer back on, and add the egg, followed by the vanilla.

Meanwhile, in a medium bowl, combine the flour, baking powder, sea salt, and nutmeg.

Switch mixer to low and add half the flour mixture, followed by all of the buttermilk and then the second half of the flour mixture. Add the zest and mix on low just until combined.

Spoon batter into prepared pan. Arrange the apple slices in a circle along the outer edge of the pan, so that the slices are set straight down onto the batter. Create a star pattern inside the circle, and add one final slice at the very center. Sprinkle the top with 2 tablespoons sugar and several grates of nutmeg.

Bake for 50 – 60 minutes, or until the top is a light golden brown and a toothpick inserted in the center comes out with just a few crumbs attached.

Set cake aside to cool for a few minutes, then remove from the cake pan. Allow to cool completely.

Set cake aside to cool for a few minutes, then remove the springform side and allow to cool completely.